
Setting up your blog using Jekyll and hosting it on github
I wrote about my journey that led to choosing Jekyll based Poole framework
as blogging platform for this site in my previous post .
I have kept skeleton of my site in a separate foundation branch for others to easily use. You are free to fork mine to use for your own site.
In this post I will provide instructions on how to setup your own blog by using my jekyll project as foundation.
Setup
Clone foundation branch of blog-jekyll repo.
- Install Jekyll
$ gem install jekyll
###If you are deploying to github, Install github-pages gem
$ gem install github-pages
###If you plan to customize css files, Install Grunt for compiling css to single minified file
$ sudo npm install -g grunt-cli
$ npm install grunt --save-dev
Then, when you edit css files, run grunt to recompile css.
Running
To get your site running locally, start Jekyll server
$ jekyll serve --port 9999
Then, Open http://localhost:9999 in your browser to view your site.
Customize
- Update configurations in
_config.ymlappropriate to your site. - Replace
favicon.ico,images/profile.jpg,images/profile_small.jpgin assets dir with your favicon and your profile pictures. - If you are using github-pages to deploy update
CNAMEfile with your domain name or delete this file if you are not using custom domain. - Update
about.mdwith your details. - For social sharing, register your account with AddThis and obtain code to update files
addthis_follow_me.html,addthis_follow_me_header.html,addthis_share.htmlin_includesdir. - For disqus comments, update
disqusShortNameproperty in_config.ymland include optioncomments: truein yaml header of your posts. - To enable facebook comments, create new app for your website at developer page and update
facebookDevAppIdproperty in_config.ymlwith app id. If you don’t want to include facebook comments, simply comment this property. - For google analytics tracking, set up google analytics account for your site and update
_includes/google_analytics.htmlwith your site tracking code. - For showing google analytics data like page views in your site
- Follow Google Analytics superProxy guide to publish your google analytics data on to google app engine.
- Then, update
googleAnalyticsSuperProxyQueryproperty in_config.yml
- Now you can begin writing your own posts.
Configuration Options
Adding table of contents
If you would to add table of contents like this post, add property toc: ol (for ordered list) or toc: ul (for unordered list) in yaml header of your posts.
If you don’t want table of contents, simply remove toc property from header of your posts.
Including comments
The property comments: true should be added to yaml header of your posts to include comments to end of the post. If comments is not present or set to false, comments won’t be included.
Working with Drafts
You might want to keep working in progress posts as drafts until it is ready to be published. So to create posts as drafts
simply keep them in _drafts dir and Jekyll will ignore them when building site. To preview your drafts locally just
use –drafts option like jekyll serve --port 9999 --drafts and jekyll will include your drafts in local site.
Importing existing blogs to Jekyll
There are lot of tools available, if you already use other blogging platforms like wordpress or blogger and want to migrate to Jekyll. Checkout wide range of importers available for various platforms at import.jekyllrb.com. There is also wordpress plugin which makes it painless to migrate from wordpress.
One common problem when migrating from existing blogs could be the permalink structure might be different in your old blog.
For eg: wordpress uses the format ~/YYYY/MM/title, but this site uses simple format posts/title.
You don’t want to break the links of your posts you shared publicly in internet.
There are two possible solutions to preserve your links:
- You can easily change permalink structure of Jekyll to format of your choice by tweaking
_config.yml. - If you decide to switch permalink structure of Jekyll, you can keep old links as is and setup redirects in server configuration files such as
.htaccessto redirect old links to correct location.
If you use github pages to deploy, you can follow these instructions to setup redirects in github pages easily using jekyll-redirect-from gem .
Linking to other posts
You might often link between your posts using internal site links. You can use post-url
for this without having to worry about the URL’s breaking when the site permalink style changes.
Eg: {% post_url 2010-07-21-name-of-post %}
Deployment
- To deploy to github pages, create a repository
youruserame.github.ioand push your code to master branch. - For other deployment options, refer to Jekyll documentation.
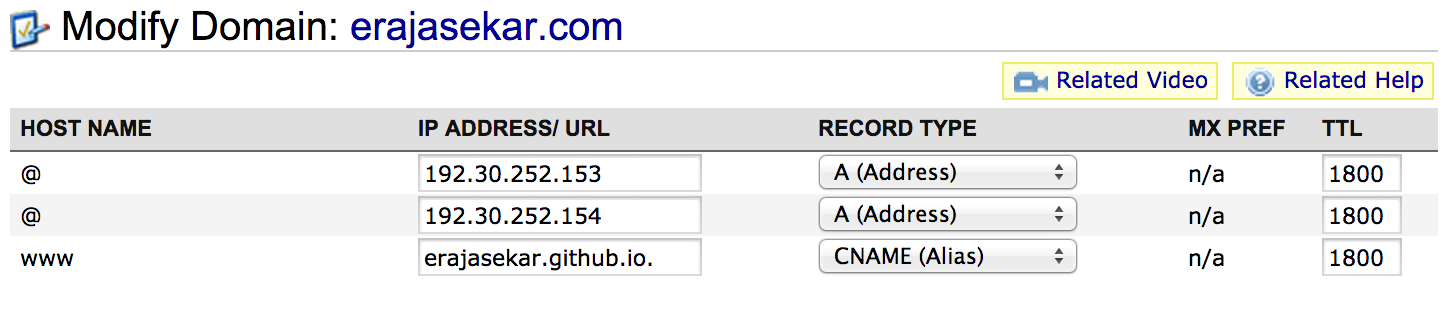
Custom domain
If you would to setup your own custom domain for your blog,
- Create a CNAME file containing your custom domain at the root of your git repository
- In your DNS provider configuration, create a CNAME record that points from that domain to
yourusername.github.io - In your DNS provider configuration, create A records that resolve to the following IP addresses
- 192.30.252.153
- 192.30.252.154
- Here is snapshot of how I configured my domain erajasekar.com with DNS provider namecheap.com
Now, you have got your own blog similar to this site.